Introduction
The most important consideration before deciding on a method is what is most important: speed (USB), automation and syncing (iCloud), or convenience to make a few shots (email). Wire it up in case you need one-time copies and the highest speed. To keep your whole library up to date on all devices, use iCloud Photos on Windows. The present instructions of Apple regarding Windows PCs include the USB importing and iCloud.
Ways to Transfer Photos
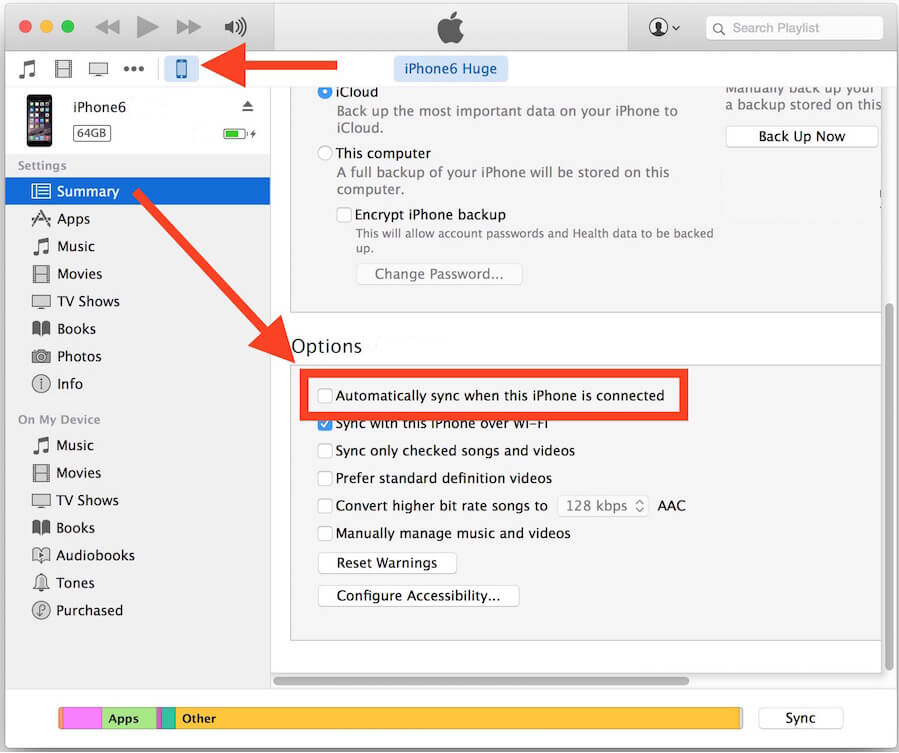
- USB (File Explorer / Photos app): Rapid and local; works best with large batches. Apple mentions that you might require the Apple Devices application on new Windows releases prior to importing.
- iTunes/Apple Devices (legacy sync): In older versions of Windows, iTunes continues to support access to devices and certain import operations.
- iCloud Photos (iCloud for Windows): wirelessly transfer photos from iphone to pc by adding your library to Windows File Explorer and Photos.
- iCloud.com: Save certain photos on any browser—no software needed.
- Email/share: Fast and easy with only a few pictures—easy but not good with big albums.
Internal iPhone assistance: In case you are arranging iPhone applications and privacy as you transfer media, visit How to Find Hidden Apps on iPhone.
How to Transfer Photos from iPhone to Computer with USB
USB is the quickest single-time process and is offline-capable—ideal when you require to transfer photos from iPhone to computer in large quantities. Apple instructions: find a cable that is data-capable and connect it, unlock the iPhone, and tap Trust.
How to Use File Explorer/Windows Explorer to Transfer Pictures From an iPhone to a Computer
A short introduction: File Explorer allows you to copy pictures directly out of the DCIM folders in the iPhone. It’s basic but reliable.
Steps:
- Step 1. Connect the iPhone to your PC with a USB-to-Lightning cable, unlock the iPhone, and tap Trust This Computer if prompted.
- Step 2. Open File Explorer → under This PC, open Apple iPhone → Internal Storage → DCIM.
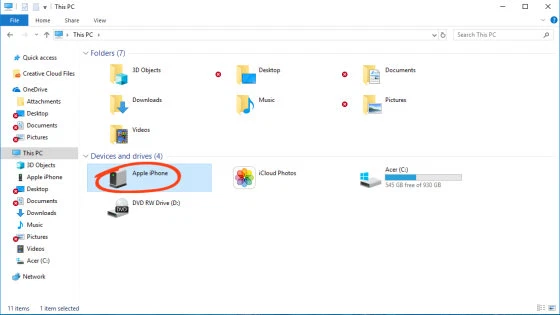
- Step 3. Select folders (e.g., 100APPLE) or photos, then Copy → paste them into a folder on your PC.
- Step 4. Optional: open the Photos app and use Import to organize by date/albums. Microsoft’s Photos app integrates with iCloud, too.
- Step 5. Verify transferred files; if you used HEIC/HEVC formats, install Microsoft’s codec packs or set iPhone Camera → Formats to “Most Compatible” and re-shoot.
Apple Support — Move photos to a Windows PC/Mac (USB basics & Apple Devices app)
How To Transfer Pictures from iPhone To PC Using iTunes
In older versions of Windows (like Windows 7/8) or some configurations, iTunes is still installed along with device drivers. Subsequent Windows 10/11 releases are more and more dependent on the Apple Devices app, although iTunes can still be obtained at Apple and the Microsoft Store.
Steps:
- Step 1. Install iTunes for Windows from Apple or the Microsoft Store and complete setup.
- Step 2. Connect the iPhone via USB, unlock it, and Trust the PC when asked.
- Step 3. In iTunes, select the device to confirm it’s recognized (syncing is optional).
- Step 4. Use File Explorer or the Photos app to import pictures from the iPhone’s storage, now that drivers are present. (Some workflows still rely on iTunes drivers to expose DCIM reliably.)
- Step 5. Safely eject the iPhone when done.
You May Also Like
- Should File Explorer become unresponsive, close it and restart it again- or perform a quick keyboard restart with our guide Restart PC with Keyboard.
- Big imports can fill your drive—check Add More Storage to PC.
Note: On Windows 10/11, the current USB-import instructions provided by Apple refer to the Apple Devices app; follow its instructions when it appears during installation.
How to Transfer Photos from iPhone to PC Wirelessly
Cable-free is the way to go when you require constant sync, desire the same edits on all devices, or intend to transfer iPhone photos to PC on a regular basis.
How To Transfer Pictures from iPhone To PC with iCloud (iCloud.com)
iCloud on the web is the fastest wireless way to download a few photos, particularly when you cannot install applications on the PC.
Steps:
- Step 1. On iPhone, ensure you’re signed in to your Apple ID and have iCloud Photos enabled (Settings → your name → iCloud → Photos).
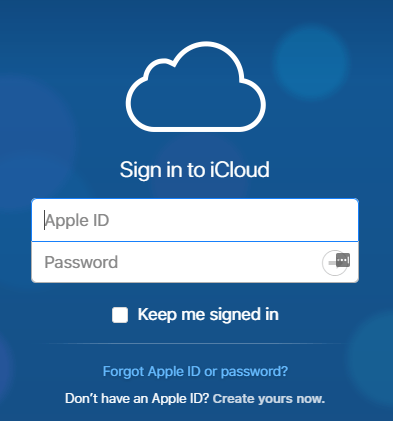
- Step 2. On the PC, go to iCloud.com/photos and sign in with the same Apple ID.
- Step 3. Select photos/albums → click Download to save copies locally.
- Step 4. Organize the downloads into your Pictures folder.
This is the easiest method of how to copy your photos from iPhone to PC without the need to install any software.
BlogTechHub reads that can help you once you transfer:
• How to Add More Storage to PC (when the import fills your drive).
• How to Restart PC with Keyboard (useful when File Explorer is not responding).
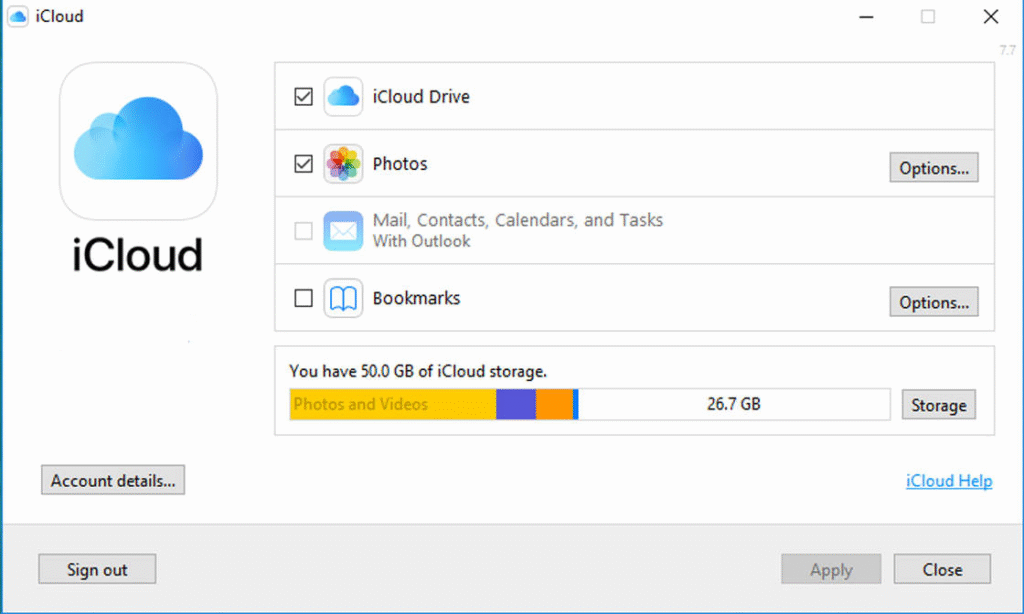
How To Transfer Pictures From iPhone To PC Using iCloud Photos (iCloud for Windows)
To be able to wirelessly transfer photos from iPhone to PC all the time, download iCloud for Windows. It integrates iCloud Photos with File Explorer and Microsoft Photos.

Steps:
- Step 1. Install iCloud for Windows from the Microsoft Store.
- Step 2. Open iCloud for Windows, sign in, and enable Photos (iCloud Photos).
- Step 3. On iPhone: Settings → your name → iCloud → Photos → and then switch on Sync this iPhone.
- Step 4. On the PC, open File Explorer → iCloud Photos (left pane) to see and download files; they can also be viewed in the Microsoft Photos app.
- Step 5. Optional: Enable Optimize Storage on iPhone to store locally and store full-res originals in iCloud.
Apple Support — Use iCloud Photos on your PC (iCloud for Windows setup):
Transfer Pictures From iPhone To PC with Email
Email is okay with a couple of pictures when you do not have cables or administrative privileges to install software. It is not the best with albums because of file size restrictions.
Steps:
- Step 1. In Photos on iPhone, select the images → Share → Mail.
- Step 2. Send to your own address; choose Actual Size if the option appears.
- Step 3. Open the email on your PC and save the attachments in your Pictures folder.
- Step 4. Repeat other sets or use iCloud/USB with larger batches.
Frequently Asked Questions
How can I transfer photos from iPhone to Windows PC?
View Answer
Use USB (File Explorer or the Photos app) for speed, or use iCloud (iCloud for Windows or iCloud.com) for wireless sync.
Why can’t I transfer all my photos from iPhone to PC?
View Answer
Typical reasons: phone is locked, not tapped Trust, drivers are missing, or iCloud-only items have not been downloaded to the device. Install the Apple windows (Apple Devices/iTunes), log in to iCloud, and re-import.
How do I export photos from my iPhone?
View Answer
For one-time copies, connect via USB and use File Explorer. For ongoing sync, enable iCloud Photos on iPhone and install iCloud for Windows to see the library in File Explorer and Microsoft Photos.
How to transfer files from iPhone to PC using USB cable?
View Answer
Plug the phone in, unlock it, and in File Explorer, tap Trust, and copy out of DCIM or in the Photos app, tap Import.
Conclusion
USB + File Explorer is the simplest method to transfer photos from iPhone to PC due to its speed and control.To be convenient and set and forget, enable iCloud Photos and sync to Windows to have new shots automatically. Need just a handful of images? Email works in a pinch. Select the method that fits your storage and workflow, and reconsider our PC storage and troubleshooting tutorials in case imports reveal larger space or stability problems.

